 There
are just two more rigs to conclude this look at the pike rigs I. One is basically
a plain old float fishing set up. I mainly use this from the boat for drifting
or trolling live or deadbaits, but it has also been used to good effect from the
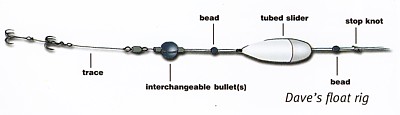
bank. It consists of a stop knot, bead, tubed sliding float, bead, bullet weight
and a trace. Using just enough weight to cock the float I can use this rig for
presenting a bait off the bottom - either trolled or dragged behind drifting boat,
or drifted from an anchored boat. By moving the stop knot up and setting the float
over depth you can soon be fishing a float legered deadbait too.
There
are just two more rigs to conclude this look at the pike rigs I. One is basically
a plain old float fishing set up. I mainly use this from the boat for drifting
or trolling live or deadbaits, but it has also been used to good effect from the
bank. It consists of a stop knot, bead, tubed sliding float, bead, bullet weight
and a trace. Using just enough weight to cock the float I can use this rig for
presenting a bait off the bottom - either trolled or dragged behind drifting boat,
or drifted from an anchored boat. By moving the stop knot up and setting the float
over depth you can soon be fishing a float legered deadbait too.
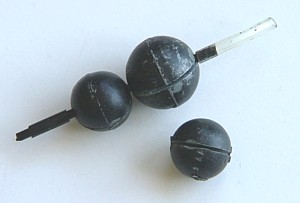 I
use interchangeable bullets on this rig, ones I make myself by drilling out the
central hole and cutting a slot in them. This lets me add extra weight, with little
fuss, when I want to put a bait on the bottom. I have tried the Fox Quick Change
weights, but for some reason I found them prone to tangling on the cast. But I
guess they might work for you. By removing the weight altogether, leaving its
mounting tube on the line, I can tie a paternoster link to the trace to fish a
livebait. The float rigs described in part four allow me to fish my baits in a
number of ways with the minimum of retackling, thereby maximising my fishing time
on short winter days. By having rods rigged up with the float fishing rig and
interchangeable weights, and the paternoster boom float rig described in part
four of this series I have almost instant access to a number of methods - float
legering, drifting or trolling baits off bottom, paternostering and trollernostering.
They can also be used from the bank with equal success.
I
use interchangeable bullets on this rig, ones I make myself by drilling out the
central hole and cutting a slot in them. This lets me add extra weight, with little
fuss, when I want to put a bait on the bottom. I have tried the Fox Quick Change
weights, but for some reason I found them prone to tangling on the cast. But I
guess they might work for you. By removing the weight altogether, leaving its
mounting tube on the line, I can tie a paternoster link to the trace to fish a
livebait. The float rigs described in part four allow me to fish my baits in a
number of ways with the minimum of retackling, thereby maximising my fishing time
on short winter days. By having rods rigged up with the float fishing rig and
interchangeable weights, and the paternoster boom float rig described in part
four of this series I have almost instant access to a number of methods - float
legering, drifting or trolling baits off bottom, paternostering and trollernostering.
They can also be used from the bank with equal success.
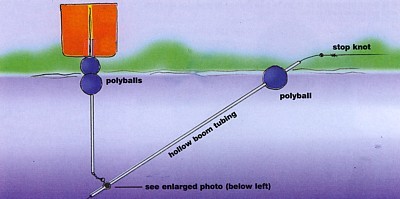 The
final rig I want to describe in this series is my drift float set up. I don't
use this as much as I used to, mainly because I haven't been fishing any suitable
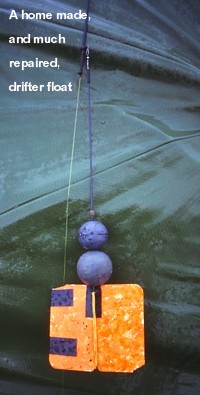
waters recently. Although with the advent of braid drift float fishing has become
much easier I still use the controller style of drift float these days, with a
home made float attached to this. Again my interchangeable weights are used to
cock the float. The controller is stopped from sliding down to the trace by a
bead and stop knot above the trace. This prevents the float tangling with the
trace on the cast. I prefer the
The
final rig I want to describe in this series is my drift float set up. I don't
use this as much as I used to, mainly because I haven't been fishing any suitable
waters recently. Although with the advent of braid drift float fishing has become
much easier I still use the controller style of drift float these days, with a
home made float attached to this. Again my interchangeable weights are used to
cock the float. The controller is stopped from sliding down to the trace by a
bead and stop knot above the trace. This prevents the float tangling with the
trace on the cast. I prefer the 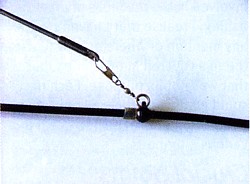 bottom
end drift float design because it retrieves more smoothly, doesn't rely on release
systems from the top of the float, doesn't tangle - and works pretty well. Simple,
effective. That's all you need in a pike rig, no matter how it is intended to
present a bait.
bottom
end drift float design because it retrieves more smoothly, doesn't rely on release
systems from the top of the float, doesn't tangle - and works pretty well. Simple,
effective. That's all you need in a pike rig, no matter how it is intended to
present a bait.
As
you might have noticed throughout this trawl through my pike rigs, I haven't mentioned
traces much. This is purely because I only use one trace for almost all of my
bait fishing. It is long enough to be safe to the pike and short enough to cast
without tangling. I don't measure them and they all end up different lengths,
usually between fifteen and eighteen inches I guess.
I
think the trend for long traces, I have seen them recommended as long as three
feet, is a bit over the top. As I have stated throughout this series, avoiding
tangles on the cast is the best way of avoiding bite-offs with most rigs, and
there is no doubt that short traces are less tangle prone than short ones.
 The
two things that modern 'caring' pike anglers are obsessed with avoiding are bite-offs
and deep hooking. And quite rightly so, but are they as big a problem as they
are made out to be? Not in my experience they aren't. It's all a matter of looking
at the system as a whole, and being aware of what actually happens rather than
what might happen in theory. I feel that both 'problems' can be almost eliminated
by the combination of rigs that don't tangle and efficient bite detection.
The
two things that modern 'caring' pike anglers are obsessed with avoiding are bite-offs
and deep hooking. And quite rightly so, but are they as big a problem as they
are made out to be? Not in my experience they aren't. It's all a matter of looking
at the system as a whole, and being aware of what actually happens rather than
what might happen in theory. I feel that both 'problems' can be almost eliminated
by the combination of rigs that don't tangle and efficient bite detection.
Anyway,
I make my traces up from stainless steel multistrand wire of forty to sixty pounds
test, with a size eight Power Swivel at one end (with the twisted connection sleeved
in shrink tube) and two Owner ST-41 trebles at the other end. Hook size depends
how I am feeling but is between six and two, depending on bait size. At times
I have used a larger hook for the upper position than the bottom hook. This gives
better hooking of the bait. The hooks are spaced as I feel appropriate to the
baits I am using at the time, the aim being to put one as close to each end of
the bait as I can. If I switch to a smaller bait I wrap the trace around it -
maybe ending up with a hook on each side of the bait. Lazy, bodging it? I don't
care! It works, so I do it.
I
know that the 'politically' correct advice on hook spacing is to place them towards
the tail end of the bait, no more than half way down, so as to avoid deep hooking.
Why this is always recommended for deadbaits, while livebaits are always described
as being hooked with one hook in the dorsal region and one in the pectoral root
(near the head!), has always confused me. Especially as my experience has been
that pike are more likely to swallow livebaits quickly than they are deadbaits
- although that could reflect where and when I have done my fishing. What I do
know is that pike can, and do, grab baits in odd places. I recently had a jack
grab a livebait by the tail and many times I have had legered deadbaits picked
up by the head end, and not swallowed, resulting in a missed run and a mangled
bait.
Why
such heavy wire for bait traces? Well, the reason is quite simple. Thicker wire
is stiffer wire, and stiffer wire tangles less. It also kinks up less when you
catch a fish on it. So, I get fewer tangles and my traces last longer, meaning
that I don't need as many spares and can spend more time fishing and less time
retackling.
 You
might have noticed that I don't attach my traces to the line with a snap link
as you often see recommended. There are a few reasons for this. One is that I
carry my rods fully tackled up, and on arriving at a swim I can have four baits
in the water before my mates who carry their traces in a rig bin have got two
cast out! A second reason, which is less a concern with braid than mono, is that
leaving a clip tied to the end of your line can lead you to fish with a weakened
knot. Mono knots should be cut back and retied at the start of every session.
It takes very little more time to tie a new knot than it does to open a snap link
and clip on a trace, so I opt for security rather than speed in this instance.
A final reason for not using clips is that they make it almost impossible to have
a stiffish joint between trace and line, leading to more opportunity for tangles
- in my experience.
You
might have noticed that I don't attach my traces to the line with a snap link
as you often see recommended. There are a few reasons for this. One is that I
carry my rods fully tackled up, and on arriving at a swim I can have four baits
in the water before my mates who carry their traces in a rig bin have got two
cast out! A second reason, which is less a concern with braid than mono, is that
leaving a clip tied to the end of your line can lead you to fish with a weakened
knot. Mono knots should be cut back and retied at the start of every session.
It takes very little more time to tie a new knot than it does to open a snap link
and clip on a trace, so I opt for security rather than speed in this instance.
A final reason for not using clips is that they make it almost impossible to have
a stiffish joint between trace and line, leading to more opportunity for tangles
- in my experience.
I'll
admit that on those days that two runs come simultaneously being able to unclip
a trace with a pike attached might be handy, but having managed without this minor
benefit for years I think I'll carry on as I am. If I'm really desperate I cut
the trace off. Anything on the line, like floats or bombs, which might slide off
and get lost, can be put in your pocket. Doesn't take too long to slip them back
on the line before retying the trace.
So
that pretty much covers my thinking on pike rigs at this point in time. Maybe
a few years on my views will have changed, as they have done in the twenty odd
years I have been involved in the madness of pike fishing. I realise that I haven't
made any mention of where or how to use the rigs covered in this series, but that
was not its purpose. Each rig could justify an article all of its own, going in
to detail of how to use it in various situations.
Whenever
you are thinking about rigs bear in mind three key things; keep them as simple
as possible, avoid tangles, and use efficient bite indication. That way you will
reduce the incidence of dropped runs, bite-offs and deep hooked pike. It really
is that basic.
The
most crucial lesson I have learned in my piking is that, just as it is more important
to think about lure fishing in terms of location and presentation (in that order)
than lure colour and action, so it is more important to think of bait fishing
in the very same terms of location and presentation, rather than rigs. I've been
through the fancy rig stage, and I now know for sure that it's not the rig that
catches the pike, it's where you put it that matters most.